
![]()
![]()
In the Advanced Preferences page, the following options can be configured:
§ Verbose log files
§ Temporary Directory
§ Transfer Recovery
Note: These options are only available in Enhanced operating mode. See also Operating Mode.
To access your Advanced Preferences:
¨ Click the Preferences button in the left pane and then click Advanced Preferences.
IMPORTANT: Click the Apply button to save your preferences. If you navigate to another page without clicking Apply, your preferences will not be saved.
Only select the Create verbose log file option if instructed by technical support.

If you are running Attunity MFT Web Client in Java applet mode, messages will be displayed in the Java Console. If you are running Attunity MFT Web Client in ActiveX model, the verbose log file will be created in:
<drive>:\Documents and Preferences\<local_user>\Local Preferences\Temp\BHub_Client_ocx.log
To create a verbose log file:
¨ Select the Create verbose log file check box.
See also: Operating Mode.
If you enabled the package zipping or encryption options, the source files will be copied to a temporary directory before the package is created. The files will either be copied to the default Attunity MFT temporary directory (located under your Windows home directory) or a different directory, according to your preference. The path of the default Attunity MFT temporary is determined by your current Attunity MFT Web Client operating mode: ActiveX or Java Applet (see below).
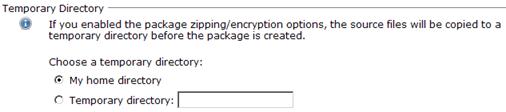
To copy the source files to the default temporary directory:
¨ Select the My home directory option.
If you are using Attunity MFT Web Client in ActiveX mode, the files will be copied to:
%temp%\softlink\bhub\temp
If you are using Attunity MFT Web Client in Java mode, the files will be copied to the path defined by the Java system property: user.home
On Windows machines, for example, user.home points to the following path:
%userprofile%\softlink\bhub\temp
Note: In the Transfer Preferencespage, you can choose whether to use ActiveX or Java Applet operating mode.
To copy the source files to a different directory:
¨ Select the Temporary directory option and then specify the full path of the temporary directory in the designated field.
The source files can be copied to a temporary directory before the package is created, but will only remain in the temporary directory if the package upload fails. This is recommended if the source file content is frequently changing as it ensures that, in the event of transfer recovery, the files that were originally transferred will be recovered (and not a different version).

To copy the source files to a temporary directory before the package is created:
¨ Select the Copy files to a temporary directory option.
See also Specifying a Temporary Directory above.