
![]()
![]()
Packages can contain files or a message or a combination of both. To send a package you must, as a minimum requirement, specify a recipient. You can also choose additional transfer and security options as described in Advanced Tab.
The package sending options differ depending on your operating mode. If your operating mode is "Enhanced", continue below. If it is Lite continue from Sending a Package in Lite Operating Mode. For a description of Enhanced and Lite, see Terminology.
In order to send a package the only requirement is to specify at least one recipient. All other options such as specifying a subject, writing a message and adding files are optional.
To send a package:
1. Click the ![]() (New) button in the left pane.
(New) button in the left pane.
The New Package window opens displaying the Package tab.
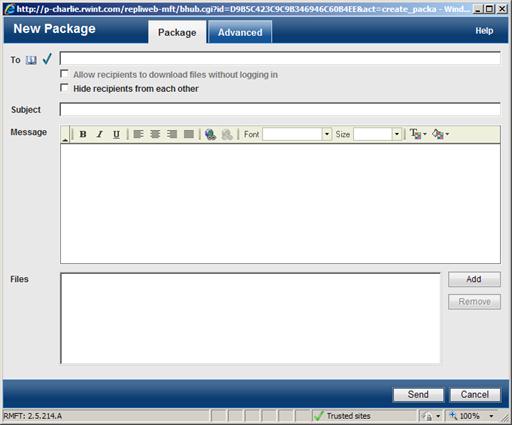
2. In the To field, specify the recipient names. You can either type them or select them from the Address Book (recommended) by clicking the ![]() button next to the To. Recipients can be users, distribution lists and/or hosts. You may also be allowed to send packages to recipients who are not Attunity MFT users. For more information, see Inviting Users.
button next to the To. Recipients can be users, distribution lists and/or hosts. You may also be allowed to send packages to recipients who are not Attunity MFT users. For more information, see Inviting Users.
Note: If you cannot remember the recipient’s user name or are unable to locate it in the address book, then you can specify his/her e-mail address instead. The e-mail address will be used by Attunity MFT Server to identify the intended recipient.
When typing host names, you must use a special format consisting of the host nickname followed by the target nickname. For example:
bach:brandenburg
For more information on host name formats, see Terminology.
Multiple recipient names must be separated by a semi-colon and no spaces, for example: mike;jane;peter;mozart:serenade
Note: Attunity MFT Web Client's auto-complete feature will automatically complete unambiguous recipient names. For example, if the recipient's user name is "andrew" and no other user names begin with "an", typing "an" is sufficient.
If you typed the recipient names, it is a good idea to verify whether you specified valid recipient names by clicking the ![]() below the
below the ![]() button. For more information about checking recipient names, see Checking Recipient Names.
button. For more information about checking recipient names, see Checking Recipient Names.
3. To prevent recipients from seeing who else the package was sent to, select the Hide recipients from each other check box.
4. To allow recipients to download files without logging in, select the Allow recipients to download files without logging in check box. This option will only be displayed if it is has been enabled by your Attunity MFT administrator.
Note: Selecting this option makes it easier for the recipients to download the files, but it will also allow anyone with access to the recipients’ computers to download the package files (since login is not required). Therefore, it is advisable to only select this option if the files that you are sending do not contain any confidential information.
5. In the Subject field, enter a package subject.
6. In the Message field, write a message to accompany the package.
7. (Optional) To choose files:
a. Click the Add button to the right of the Files field.
The Choose file dialog box opens.
b. Either double-click a file or select a file and then click Open.
The file is added to the list.
8. (Optional) To choose multiple files at the same time:
a. Click the Add button to the right of the Files field.
The Choose file dialog box opens.
b. Perform one of the following tasks as appropriate:
o Adding a group of files: While holding down the [Shift] key, click the file at the beginning of the group and then click the file at the end of the group.
o Adding individual files: While holding down the [Ctrl] key, click the files that you want to add.
c. Click Open.
The files are added to the Files field.
9. To remove a file, select the file in the File pane and click Remove. (Use the Shift or Ctrl keys to select multiple files for removal).
10. To send the package, click the Send button at the bottom right of the tab (The Advanced tab also contains a Send button).
The Upload Progress window opens.
Note: If you are using Java as your operating mode, when sending the package a Java security dialog may ask you whether you want to run BHubApplet.
This dialog will only be displayed if:
- You did not agree to always trust BHubApplet the last time you were prompted to do so (either while completing the Attunity MFT Web Client Setup Wizard or while sending a package).
- The security certificate has been deleted from the Java trusted certificates store.
11. Agree to run the BHubApplet applet.
For more information, about sending methods, see Operating Mode.
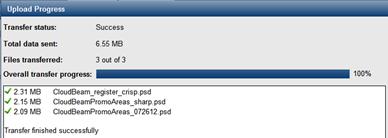
The Transfer Progress window opens when you send a package.
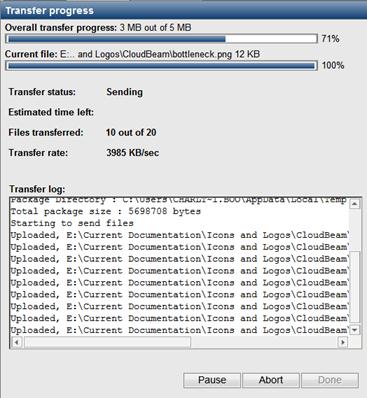
The Transfer Progress window provides a progress report and transfer-related information, including:
§ Overall transfer progress – The total overall transfer progress.
§ Current file - The name and transfer progress of the file that is currently being transferred.
§ Transfer status - The current transfer status.
§ Estimated time left - The transfer progress in terms of remaining time.
§ Files transferred - The number of files transferred so far.
§ Transfer Rate - The current transfer rate.
§ Transfer log - provides various information about the transfer including the name of the directory in which the package was created, the total size of the package, the package ID and how many files were transferred successfully.
Note: The total number of files transferred includes two Attunity MFT files (<name>.control and <name>.content) that are created during the packaging process and that are required by Attunity MFT Server. In other words, if you selected four files to transfer, the transfer report will state that six files were successfully transferred.
To pause a transfer:
The caption on the Pause button changes to Resume.
To resume a paused a transfer:
To abort a transfer:
¨ Click the Cancel button and then click Done.
To close the Sending Package window:
When sending a package, you can override several of your default transfer and security preferences. For more information, see Advanced Tab.
For more information on default preferences, see 9. Setting Preferences.
To send a package:
1. Click the ![]() (New) button in the left pane.
(New) button in the left pane.
The New Package window opens, displaying the Package tab.
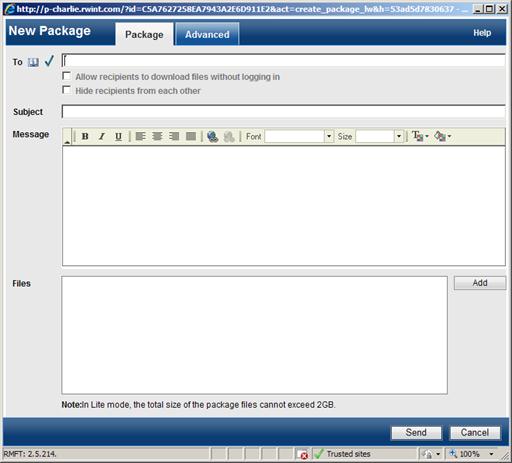
2. Perform steps 2-6 of Sending a Package in Enhanced Operating Mode.
3. To select a file:
a. Click the Add button.
A Browse button appears.

b. Click the Browse button.
The Choose File to Upload dialog box opens.
c. Double-click the file that you want to send.
The file is added to the Files field.
d. To select more files, repeat steps a-c.
4. To send the package, click Send.
The Upload Progress window opens, showing you the files that you selected to send. While the transfer is in progress, both the Total data sent value and the size of the file currently being transferred are updated every few seconds to show how much data has already been uploaded.
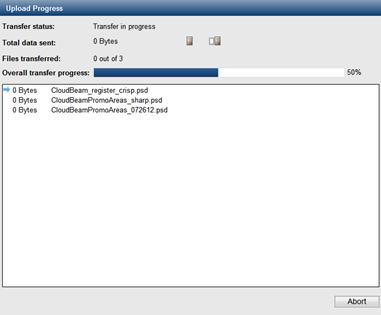
5. To abort the upload operation, click Abort.
When the transfer completes, a transfer report is shown. The report includes the total amount of data transferred, the amount of data transferred for each file and the completion status of each file (indicated by an icon).
6. Click Done to close the Upload Progress window.
When sending a package, you can override several of your default transfer and security preferences. For more information, see Advanced Tab.
For more information on default preferences, see 9. Setting Preferences.
After typing the recipient names, you can click the ![]() below the
below the ![]() button to verify that you have specified valid recipients. If all of the recipients are valid, a confirmation will be displayed. Even if you do not click the Check Recipients link, Attunity MFT verifies the validity of each recipient before sending the package. If the validity of one or more of the recipients cannot be verified, the Check Recipients window opens:
button to verify that you have specified valid recipients. If all of the recipients are valid, a confirmation will be displayed. Even if you do not click the Check Recipients link, Attunity MFT verifies the validity of each recipient before sending the package. If the validity of one or more of the recipients cannot be verified, the Check Recipients window opens:
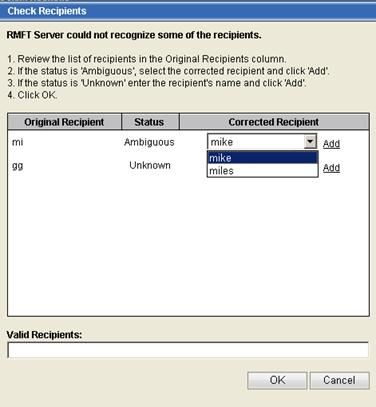
In the above example, users mi is "Ambiguous" meaning that there are several valid user names beginning "mi" (mike and miles in the example). The other recipient is "Unknown", meaning that he/she is not a valid user.
1. To correct "Ambiguous" recipients, select the intended recipient from the drop-down list in the Corrected Recipient column and then click Add.
The recipient is added to the Valid Recipients field at the bottom of the window.
2. To correct "Unknown" recipients, type the correct recipient user name in the Corrected Recipient column and then click Add.
The recipient is added to the Valid Recipients field at the bottom of the window.
3. After you have corrected all the recipients, click OK.
The package will be sent if you already clicked the Send Package button and if all the corrected recipient user names are valid.
If have not already clicked the Send Package button, the program returns you to the Package tab.
The Address Book contains the names of all the Attunity MFT users or distribution lists to which you are permitted to send packages. Using the search feature, you can easily search for specific users or groups of users that match your search criteria.
To select recipients from the address book:
1. Click the ![]() button next to the To field.
button next to the To field.
The Address Book window opens.
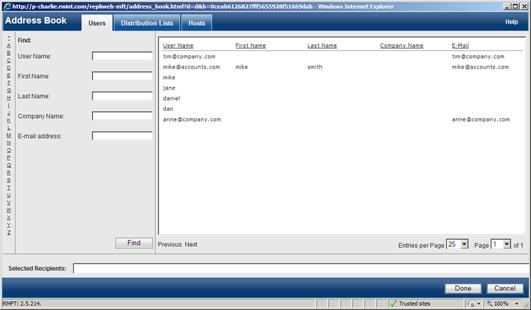
The Address Book is divided into three tabs: Users, Distribution Lists and Hosts. In each of these tabs, the procedure for selecting and searching for recipients is identical. The right side of the tab lists the recipients that you are permitted to send packages to while the left side of the tab enables you to search for recipients.
2. To add recipients, click the Attunity MFT entities to which you want to send the package and then click Done.
3. To search for recipients by the first letter of their name, click a letter on the left as appropriate.
4. To search for recipients using the available search fields, enter a search string in any of the designated fields and then click Find.
Note: A search string can contain letters and/or wildcard characters. A single letter can also be used to find recipients. For example, entering “a” in the Users tab's Last Name field and “b” in the E-Mail Address field will find all recipients whose last name begins with “a” and whose e-mail address begins with “b”.