
![]()
![]()
To log in to Attunity MFT Web Client:
2. In the browser’s Address field, enter the Attunity MFT Server URL and press [Enter].
The Attunity MFT Server URL should be provided by your organization or business partner’s Attunity MFT administrator. The default URL is:
http://<Attunity MFT Server name/IP address>/attunity-mft/bhub.cgi
Or, if you are required to connect securely:
https://<Attunity MFT Server name/IP address>/attunity-mft/bhub.cgi
For more information on logging in securely, see Secure Connection Requirements.
Note: If this is the first time you are using Attunity MFT Web Client or if Attunity MFT Server has been upgraded since your last session, the Attunity MFT Web Client Setup Wizard opens. For more information, see Attunity MFT Web Client Setup Wizard.
The Attunity MFT Web Client Setup Wizard will also open if the Attunity MFT Server cookie was deleted since the last time you used Attunity MFT Web Client. For more information about cookies, see Allowing Cookies for the Attunity MFT Server Site.
Otherwise, the browser loads the Attunity MFT Web Client login page:
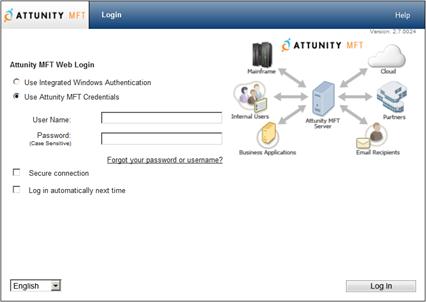
3. Choose Use Integrated Windows Authentication to log in with your currently logged in credentials (Windows) or Use Attunity MFT Credentials to log in with your Attunity MFT credentials.
4. If you chose Use Attunity MFT Credentials, specify your user name and password in the relevant fields.
5. (Only applicable to Active Directory Attunity MFT users) In the Domain field, specify your Active Directory domain.
6. To establish a secure connection to Attunity MFT Server, select the Secure connection check box.
Note: If you connected to Attunity MFT Server using HTTPS, this option will already be selected. This option requires a certificate to be installed on the IIS Server of the Attunity MFT Server machine. If you want to establish a secure connection but are not sure if the required certificate is installed, contact your Attunity MFT Administrator.
7. To bypass the login procedure each time you open Attunity MFT Web Client, select the Log in automatically next time check box.
8. Click Log In.
After logging in, Attunity MFT Web Client will display one of the following pages depending on your user account capabilities:
|
Account Capabilities |
Page Displayed |
|
Send/Receive files to/from other Attunity MFT users/hosts -OR- Only receive files from other Attunity MFT users/hosts |
Inbox Folder
See Inbox Folder. |
|
Shared Folders only. |
Upload Operations or Download Operations See 10. Shared Folders. |